
|
Estimated Time |
Up to 15 minutes |
|---|---|
|
People Required |
1 |
|
Difficulty |
|
|
Tools Required |
Small flat-head screwdriver, phone or camera, replacement air pressure sensor supplied by SOVDA |
Before You Begin
The air pressure sensor is the small square digital display in the front electrical cabinet of your SOVDA Blend. It watches the vacuum inside the blending chamber and switches the vacuum off if the pressure drops too far, which stops the lid from being pulled in and bent. When the sensor fails, it switches the vacuum off even when nothing is wrong, so your loader stops working.
Signs this guide is for you: the blender motor runs but the loader does nothing, there are no fault codes on the touchscreen, and the air pressure sensor display shows E5 instead of a number. A healthy sensor shows a pressure reading in kPa.
If your sensor shows a normal reading, this guide is not the fix. Contact Technical Service and we'll help you find the cause.
Only fit a replacement sensor supplied by SOVDA. It arrives set up for your Blend.
Photograph everything before you disconnect it. The wires on your Blend may sit in slightly different positions from the ones shown in the photos below. Your own photo is the most reliable guide when you reconnect.
If at any point you are unsure or uncomfortable, stop and contact Technical Service before continuing.
Step 1 — Isolate Power and Air
Estimated time: Less than 5 minutes | 1 person
⚠️ Working inside the cabinet with power or air connected risks electric shock, serious injury or death. Isolate both before you open the cabinet.
Switch the Blend off and isolate it at the mains supply.
Shut off the compressed air supply to the Blend and let any remaining pressure in the line release before you continue.
Open the front electrical cabinet.
Step 2 — Find the Sensor and Photograph the Wiring
Estimated time: Less than 5 minutes | 1 person
The sensor sits in the front electrical cabinet, next to the air regulator (the unit with the round dial) and the bank of air valves. It has a small square screen with three buttons underneath, a blue air hose going into it, and a thin black cable running up to the rows of wiring terminals above.
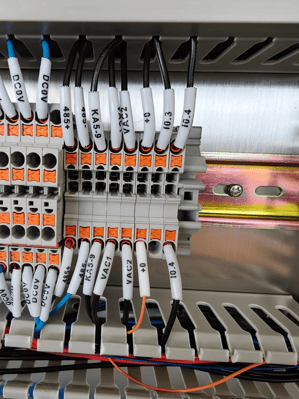
Follow the black cable up to where its individual wires go into the wiring terminals. These are push-in terminals, each with an orange release tab and a printed label on the wire.
Take a clear, close-up photo showing where each sensor wire goes. Make sure you can read the labels on the wires either side.
Step 3 — Disconnect the Wires
Estimated time: Less than 5 minutes | 1 person
For each sensor wire, press the orange tab on its terminal down with the tip of a small flat-head screwdriver, then pull the wire straight out.
Do not pull a wire out without pressing the tab, this can damage the wire end and the terminal.
Disconnect only the wires belonging to the sensor cable. Every other wire stays where it is.
Step 4 — Disconnect the Air Hose and Remove the Old Sensor
Estimated time: Less than 5 minutes | 1 person
The air hose joins the sensor with a push-fit connector, a fitting that grips the hose without any tools.
To release it, push the collar on the connector down towards the sensor and hold it there, then pull the hose straight out.
Do not pull the hose without holding the collar down, the fitting will grip harder and may damage the hose.
Remove the old sensor, feeding its cable carefully back down through the cabinet.
Step 5 — Fit the New Sensor
Estimated time: Less than 5 minutes | 1 person
Place the new sensor in the same position as the old one.
Push the air hose firmly into the push-fit connector until it stops. Give it a gentle tug to check it is held, it should not come out.
Route the new sensor's cable up to the wiring terminals along the same path as the old one.
Step 6 — Reconnect the Wires
Estimated time: Less than 5 minutes | 1 person
Using your photo from Step 2, connect each wire to the same terminal it came from. Press the orange tab down, push the wire fully in, then release the tab.
The sensor wires connect as follows:
- Brown goes to a terminal labelled DC24V, the power supply to the sensor.
- Blue goes to a terminal labelled DC0V.
- White goes to the terminal labelled IO.3, the signal to the machine's controller.
Check the +0 wire. Each terminal has a wire coming in from above and a wire coming in from below, and both carry the same label. Find the wire labelled +0 along the top row. The wire labelled +0 along the bottom row must go into the terminal directly beneath it, in the same column. If they are not in line, move the bottom wire across so they are.
Give each wire a gentle tug to check it is held firmly.
If your wiring doesn't match your photo or the list above and you are not sure, stop here and contact Technical Service with your photo.
Step 7 — Restore Air and Power, Then Test
Estimated time: Less than 5 minutes | 1 person
Close the front electrical cabinet.
Turn the compressed air supply back on and check the air regulator reads 0.4 MPa.
Restore power and switch the Blend on.
Check the sensor display now shows a pressure reading in kPa, not E5.
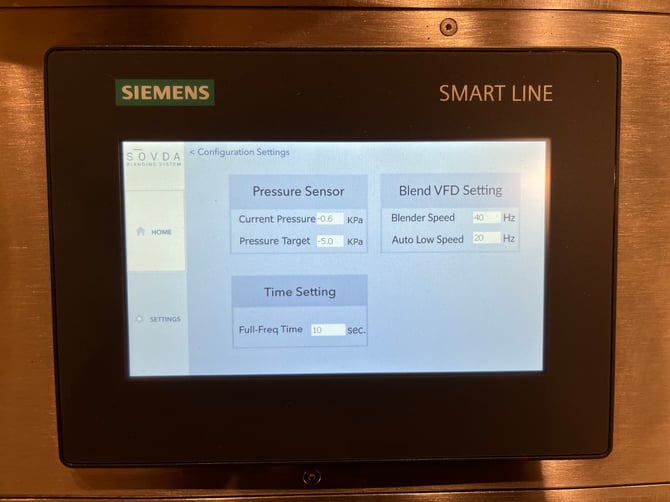
On the touchscreen, go to Settings > Configuration Settings > Pressure Setting. Check the Current Pressure shows a reading. Do not change the Target Pressure, this is set for your machine.
Switch to Manual mode and run the loader. You should hear the vacuum start and see coffee begin to load.
What's Next
Once the loader runs, you're ready to blend as normal.
If the sensor still shows E5, the loader still won't run, or you'd like a second pair of eyes on your wiring, contact Technical Service. Include your machine's serial number, a photo of the sensor display, a photo of your wiring and a short video of what happens when you try to load. It's always better to check with us now than to run the machine with a problem.