
|
Estimated Time |
1.5 to 2 hours |
| People Required | 4 people, or 1 person with a forklift |
| Difficulty | Intermediate if you are lifting with four people, or Advanced if you are using a forklift |
| Tools Required | Uncrating: socket set, Phillips number 2 screwdriver, crowbar, hammer, work gloves. Assembly: 8mm Allen key, 5mm Allen key, 13mm spanner or socket, 18mm open-ended or adjustable spanner, pliers, Phillips number 2 screwdriver, spirit level |
Before You Begin
Congratulations on your new Precision Fill!
Read this guide in full before you start, so you know what is coming and can get your people and your forklift lined up for the steps that need them. If at any point you are unsure or uncomfortable, stop and contact Technical Service before continuing.
Read this guide in full before you start, so you know what is coming and can get your people and your forklift lined up for the steps that need them. If at any point you are unsure or uncomfortable, stop and contact Technical Service before continuing.
This machine is different to the Precision Fill Mini. The Mini arrives ready to place. The Precision Fill ships in a wooden crate and its base arrives in three pieces, so there is genuine assembly work to do before you can switch it on.
Do not use a power tool when building the machine. Every bolt that holds your Precision Fill together goes in by hand. A power tool will damage the threads and may snap a bolt, which turns a straightforward assembly into a repair.
You will need room to work. Set aside at least 20 square metres, that is about 215 square feet, of clear floor space for uncrating and assembly.
Step 1 — Uncrate the Cargo
Estimated time: Up to 30 minutes | 2 people
⚠️ Photograph the crate before you open it, and note any damage on the delivery paperwork. If the machine has been damaged in transit and you have no photographs, a damage claim becomes very difficult to make.
⚠️ Wear work gloves and keep your hands clear as panels come away. Crate timber splinters and often has nails in it, and a panel that drops can break a foot.
Photograph the outside of the crate, and record anything that looks wrong on the delivery note or bill of lading.
Use an 8mm hex wrench to remove the screws holding the crate together, and lift the panels away one at a time. There may also be nails on some crates, if so, use a crowbar and hammer to free them.
With the lid off, photograph the inside of the crate before you touch anything. If anything looks damaged, stop and contact Technical Service before you go any further.
The machine sits securely in the crate rather than being bolted to it, so once the panels are off there is nothing to unfasten. Keep the machine in the crate until you are ready to lift it in Step 3.
Step 2 — Assemble the Base
Estimated time: Up to 15 minutes | 2 people
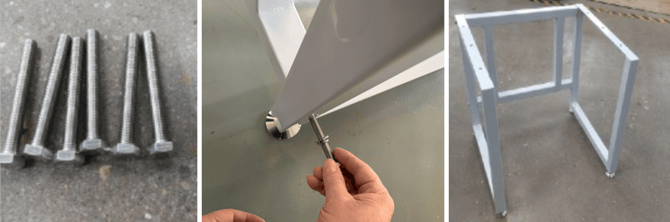
The base arrives in three pieces and bolts together.
Using the M8 70mm bolts supplied in your kit and an 8mm Allen key, connect the three pieces of the base together. Tighten each bolt by hand until it is firm, then check the assembled base sits square, with no piece standing proud of another.
Step 3 — Position the Main Body on the Base
Estimated time: Up to 30 minutes | 4 people, or 1 person with a forklift
⚠️ Check the machine is the right way round before you bolt anything together. Fix the body to the base the wrong way round and you will have to lift the machine a second time to correct it.
⚠️ When you lift, take hold of the machine itself. Lift by the machine body, not by any cover, guard or trim, and a machine of this weight coming off its lift risks serious injury or death.
Lay the base and the Precision Fill down on their sides, and line the two up the right way round.
Using the bolts and washers supplied, connect the body to the base in the order marked on the machine. These bolts take either a 5mm Allen key on the internal hex or a 13mm spanner on the external hex, whichever you find easier to get to. Tighten them by hand, no power tools.
With the body and base bolted together, lift the assembled unit using a forklift, or with three to four people, until it rests upright on its own feet.
Step 4 — Remove the Internal Shipping Supports
Estimated time: Up to 15 minutes | 1 person
⚠️ This step is critical. Leave a shipping support in place and the machine cannot weigh or calibrate correctly. If you hit a calibration error later, this is the first thing to check, and the first thing Technical Service will ask you about.
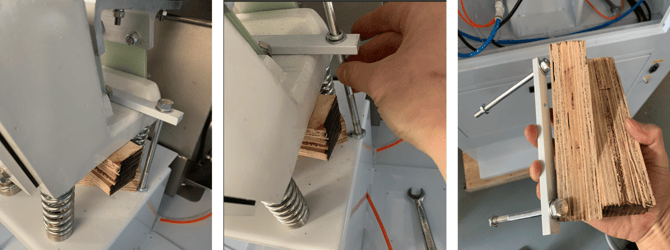
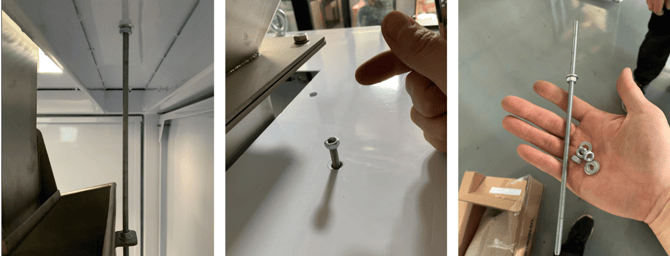
Inside the machine body you will find a bracket, a length of threaded rod, and wooden blocks. These hold the load cell, this is the part that weighs your coffee, and the vibrating motor, this is the part that moves coffee through the machine, still during shipping.
Remove all of them before you run the machine.
Photograph the inside of the machine once the supports are out, and keep the photograph. It saves a great deal of time if you ever need to raise a ticket about weighing or calibration.
Step 5 — Connect the Air, Power, and the Foot Pedal
Estimated time: Up to 15 minutes | 1 person
⚠️ Compressed air is dangerous. Work through this step only if you understand what you are doing. A line that lets go under pressure can injure you badly. If you are at all uncomfortable with this work, stop and have a qualified tradesperson do it for you.
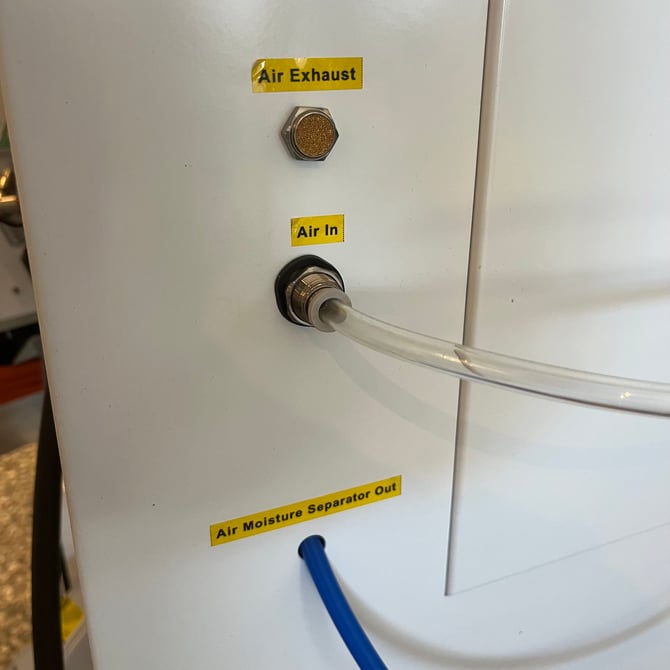
Everything is pre-fitted, so it is a matter of connecting four things in the right places.
All four ports are on the outside of the back panel, so you need clear access to the back of the machine.
Air in. Plug your air supply connector into the air in port.
Air Moisture Separator Out. This tube should not be connected to air. This is the water drain from the separator, this is the part that takes moisture out of your air supply, so the open end needs to run somewhere the water can drain away safely, this could be a floor drain, or a bucket, but usually isn't much.
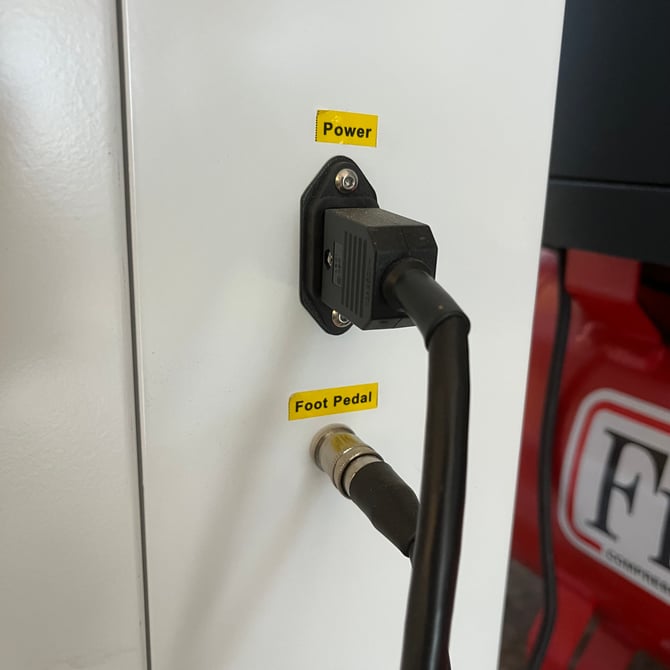
Power. Connect the power cord to the power socket.
Foot pedal. Connect the foot pedal cord to the foot pedal socket.
Reference specification: the Precision Fill uses an 8mm push-fit air connection.
 |
 |
Step 6 — Check the Air Pressure Setting
Estimated time: Up to 5 minutes | 1 person
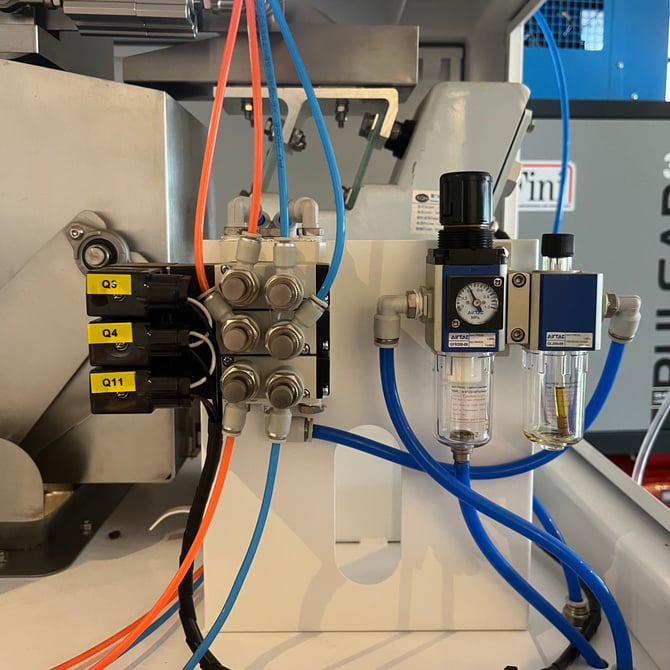
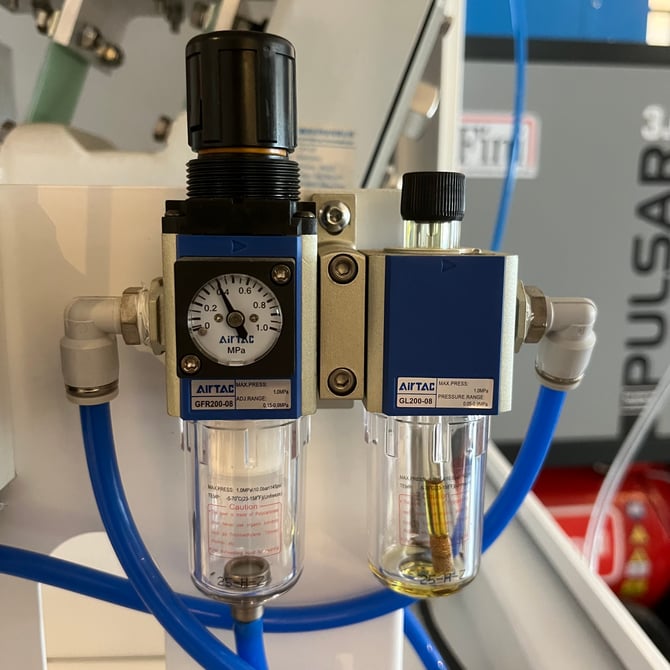
The air regulator is fitted inside the machine, behind the right side panel. The regulator is the dial that sets and holds the air pressure going into the machine.
Open the right side panel and check the regulator reads 0.4 MPa, that is 4 bar, or about 58 pounds per square inch. It leaves the factory set correctly, so this is a check rather than a job.
If it needs adjusting, lift the locking collar, twist the dial to 0.4 MPa, then push the collar back down to lock it.
Optional: air to your Lift and air gun. If you want to run air up to a SOVDA Lift, or to an air gun, add a T-shaped connector to the air in line for each one. The hook on the right side of the machine is there for hanging the air gun when you are not using it.
 |
 |
Step 7 — Level the Machine
Estimated time: Up to 15 minutes| 1 person
The machine needs to be level in two directions, left to right and front to back. This matters more than it might seem. Tilted too far back, your coffee will not discharge properly. Tilted too far forward, coffee will keep flowing out whether the machine is switched on or not.
Place a spirit level on top of the machine to work from.
To raise or lower a corner, loosen the jam nuts on the front and rear feet on whichever side needs adjusting, using an 18mm open-ended or adjustable spanner. Screw the feet in or out until the machine reads level in both directions.
Check that all four feet are firmly in contact with the floor, and tighten any that are sitting loose. A foot that is not carrying weight will let the machine rock in use and put your levelling out again.
Once the machine is level and stable, tighten all the jam nuts back down.
What's Next
With everything assembled, connected and level, your Precision Fill is ready to be calibrated. Calibration comes before anything else, because every recipe you build afterwards relies on the machine weighing accurately:
Once the machine is calibrated, carry on with:
- How to Create and Modify a Recipe on Precision Fill
- Setting a Batch Counter on Precision Fill
- Changing Measurement Units on Precision Fill
- Changing Outlet Heads
If you are also installing a SOVDA Lift, work through the SOVDA Lift Uncrate and Assembly Guide next.
If anything does not look right, or you have hit a problem part way through assembly, stop and contact Technical Service. Ask Ovi, our support assistant, in the bottom right corner of this page, or raise a ticket.